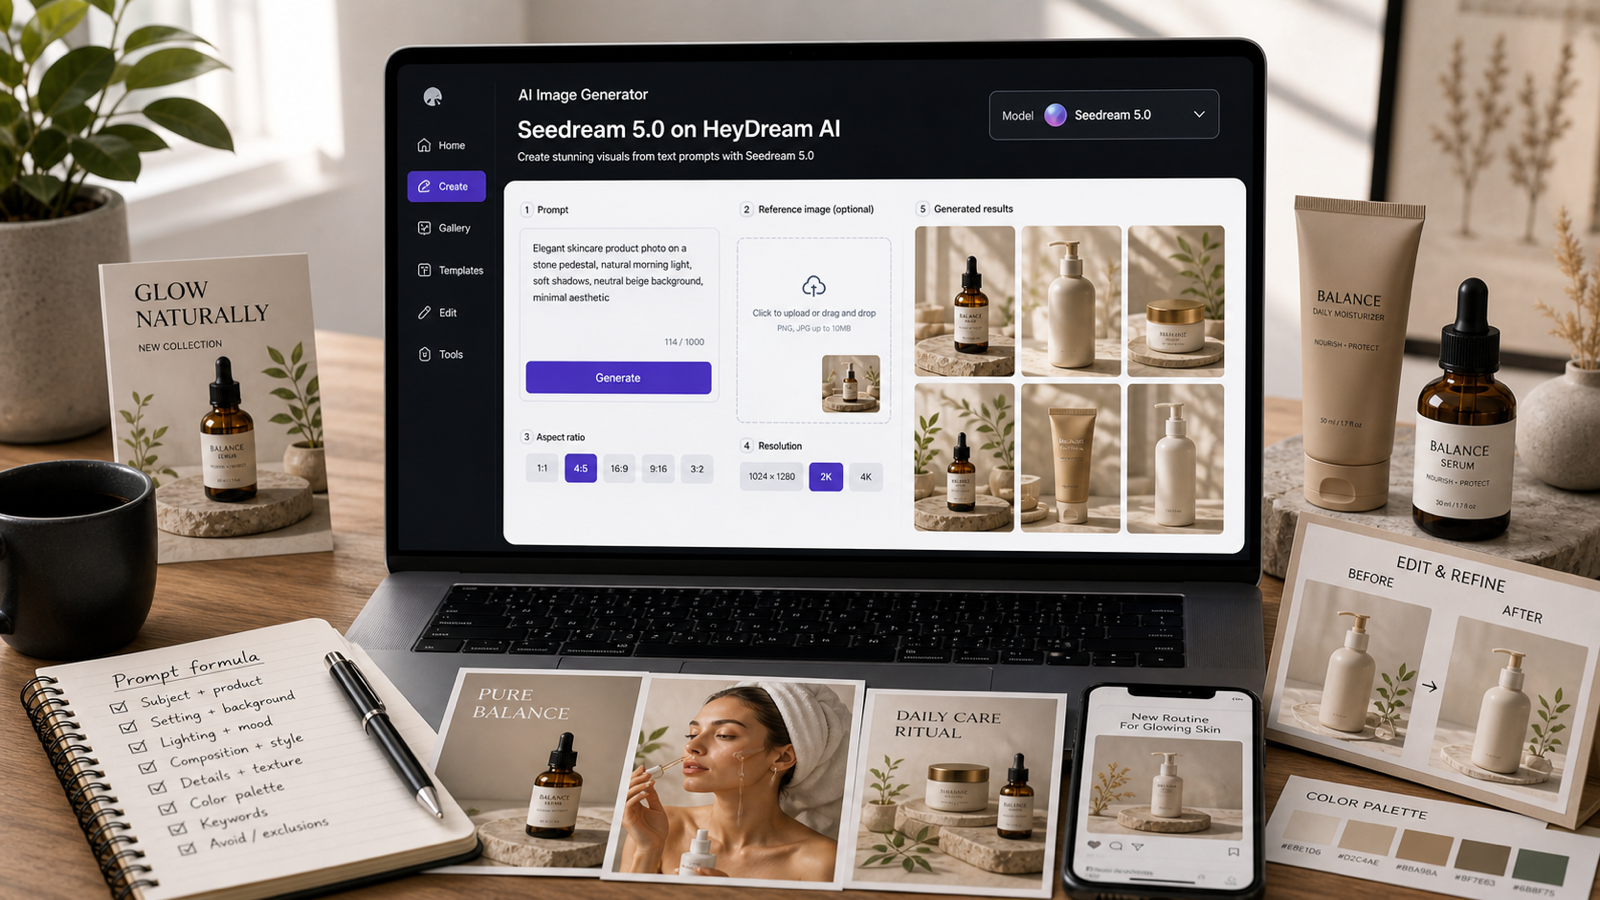
HeyDream AI gives users a flexible workspace for both prompt-based creation and guided visual editing. Instead of forcing one workflow, the platform lets you start from scratch with text, upload reference images, compare multiple models, and refine results step by step. That makes it useful for creators, marketers, designers, and beginners who want a faster way to approach modern AI image generation.
This guide explains how to use the main generator, when to choose text-to-image or image-to-image AI, and how to compare the available models in a practical way. It also highlights the embedded Nano Banana 2 workflow, which has its own dedicated model page.
Why HeyDream AI Is Easy to Start With
One of the biggest strengths of this AI image generator is that the workflow is easy to read. You select a model, upload images if needed, enter a prompt, choose quality settings, and generate. That means beginners can start quickly, while more experienced users can still test different models for different tasks.
In practical terms, the page supports two major ways to work:
- Text-to-image AI when you want to create something from an idea alone
- Image-to-image AI when you want to preserve a face, product, pose, layout, or overall composition
This makes the tool useful for concept art, posters, social visuals, product mockups, character drafts, and edited variations of existing images.
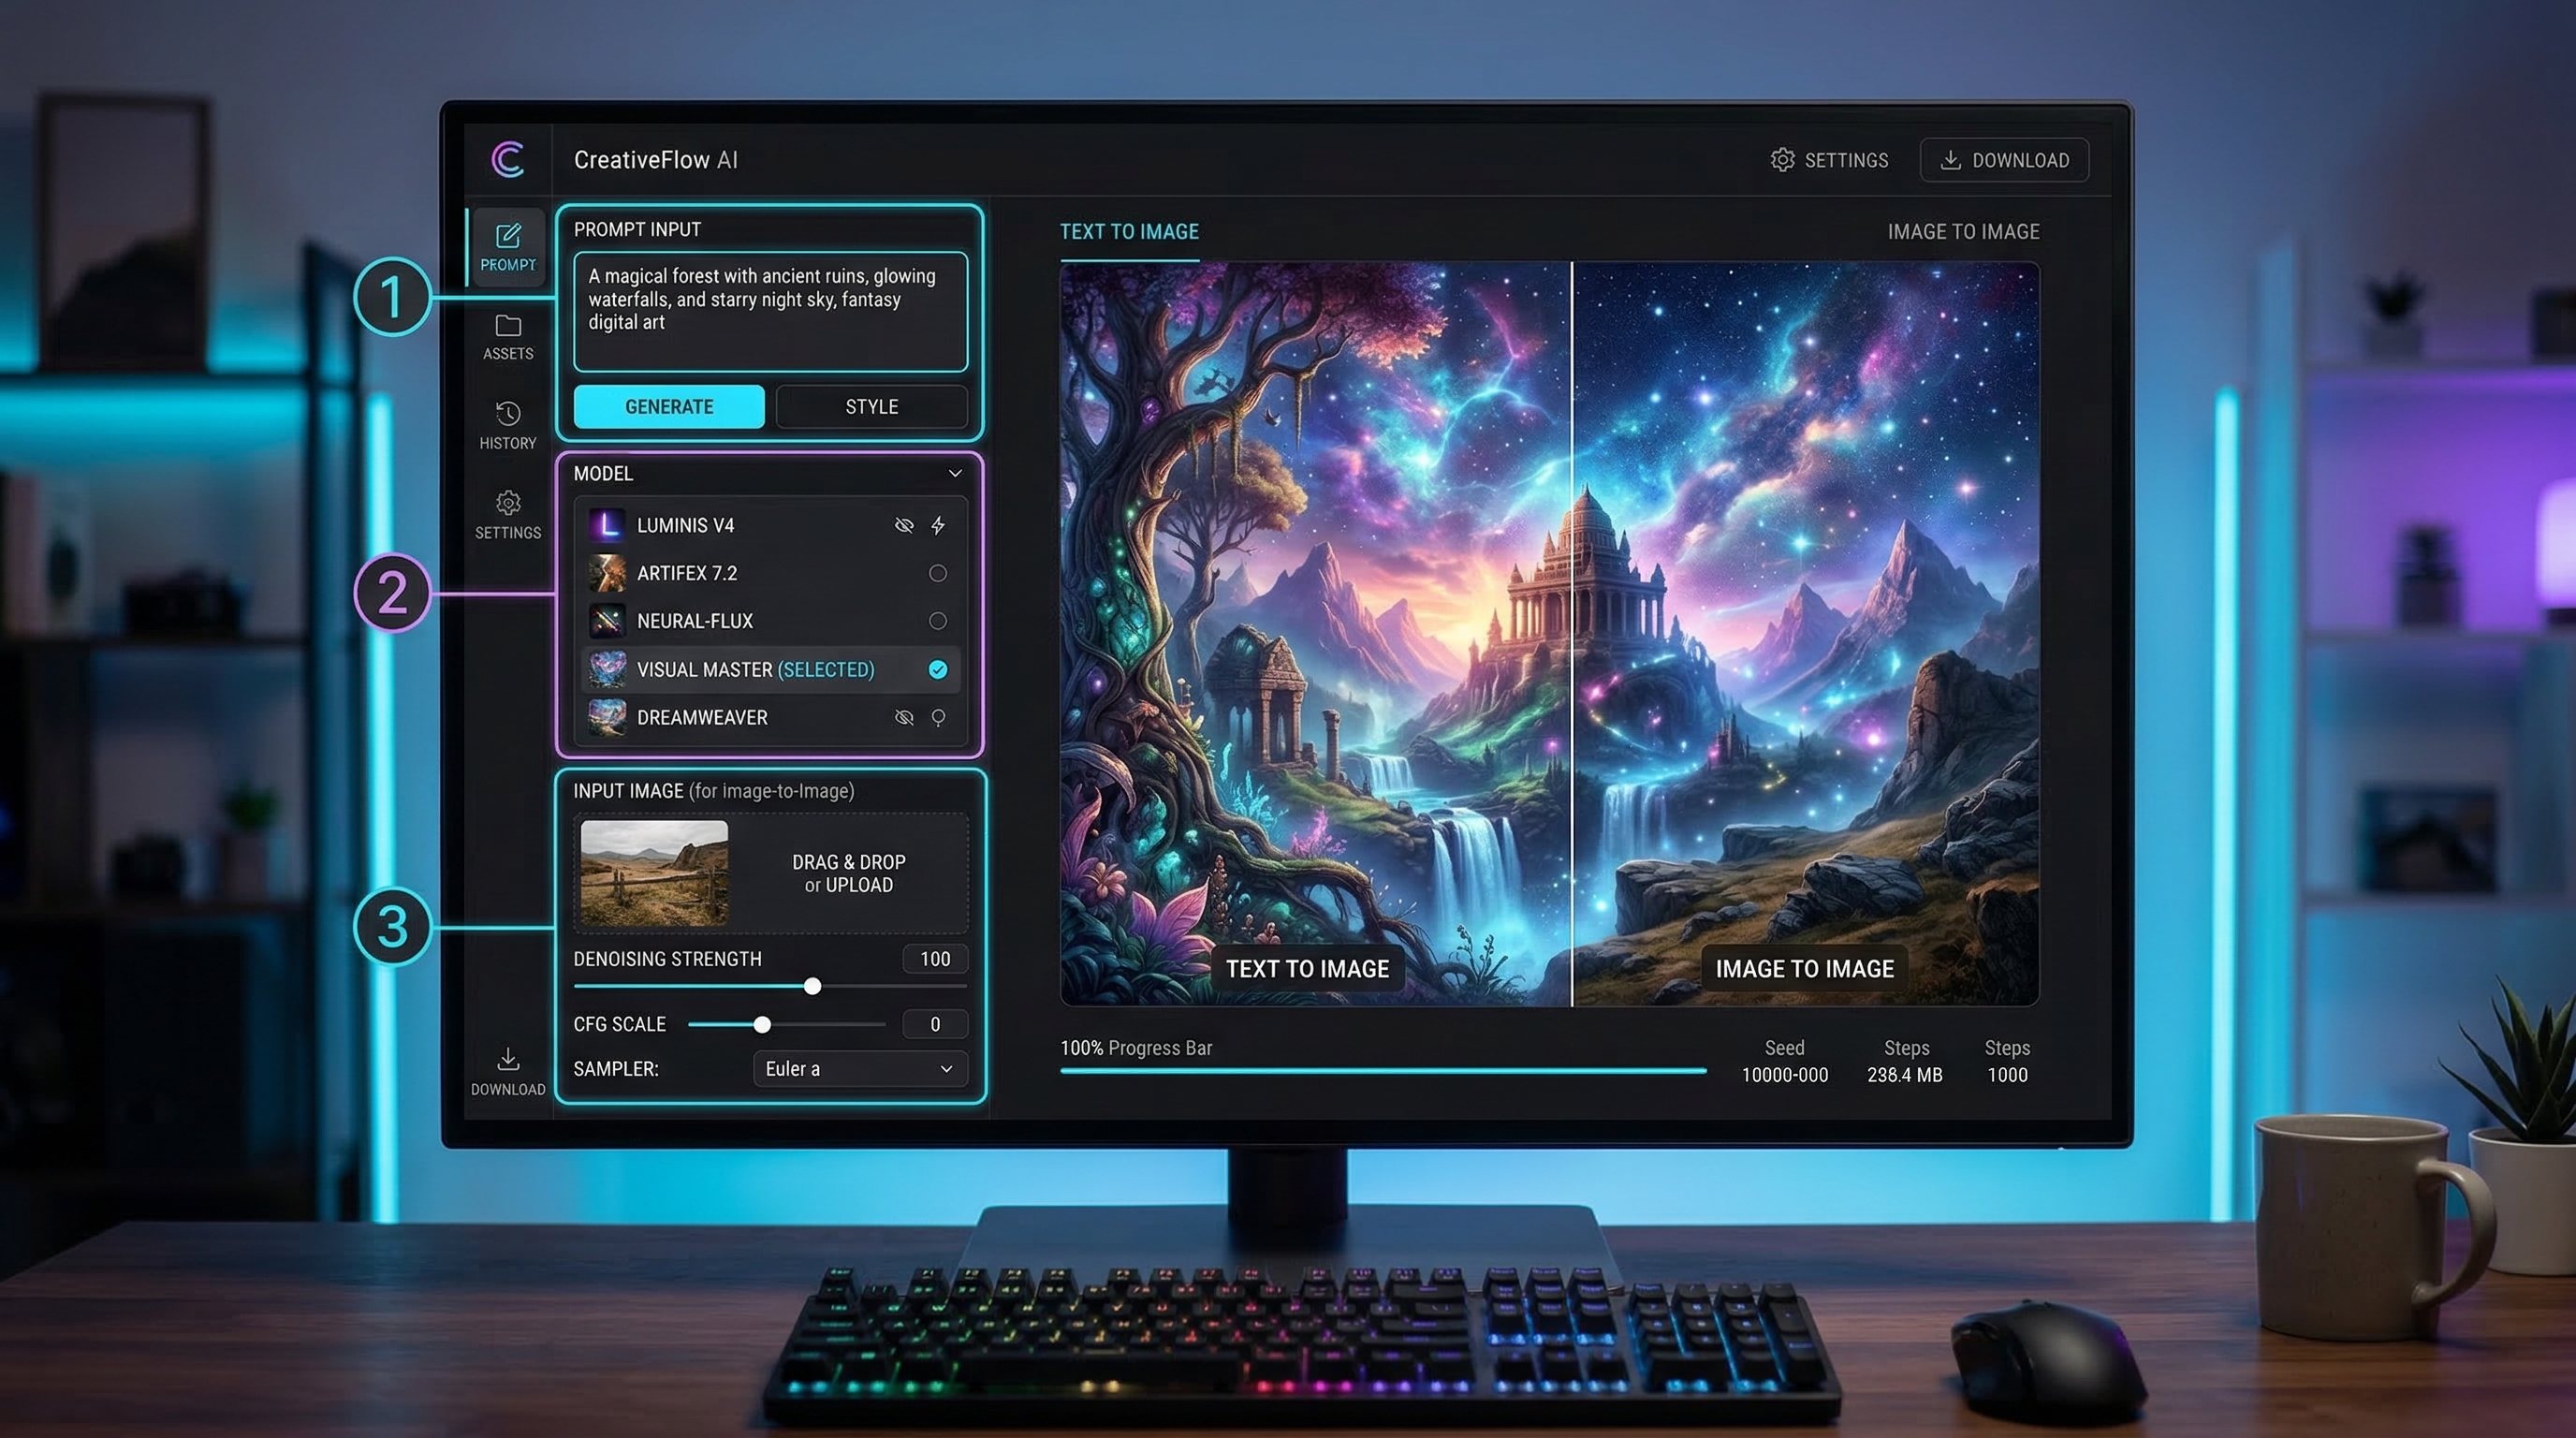
A Quick Look at the Generator Interface
Before you generate anything, it helps to understand the main controls.
Model Selector
This is the first major decision. Each model has a slightly different balance of speed, consistency, polish, and editing behavior. Instead of asking which one is universally best, it is better to ask which one fits your current job.
Upload Images
If you are using image-to-image AI, upload a reference image here. This is useful when identity, framing, or product shape matters. If you are doing pure text-to-image AI, you can skip uploads and work from prompt alone.
Prompt Box
This is where you describe the image you want. A good prompt does not need to be long. It just needs to be clear about the subject, setting, style, lighting, and any important restrictions.
Quality and Visibility Controls
These settings affect output handling and workflow. Beginners should avoid changing too many settings at once. Keep the process simple until you understand how one model responds.
Image History
Image history matters because it lets you compare versions and iterate. Instead of rewriting everything from scratch, you can keep what works and refine only what is missing.
Step-by-Step: How to Use the AI Image Generator
Step 1: Open the Main Generator
Go to the AI image generator page and review the model list first. You do not need to master every option before starting.
Step 2: Choose Your Workflow
Decide whether you need text-to-image AI or image-to-image AI.
Use text-to-image AI when:
- you are starting from zero
- you want moodboards or concept drafts
- you are testing multiple visual ideas quickly
Use image-to-image AI when:
- you want to restyle an existing image
- you need better consistency
- you want to preserve identity, layout, or product design
Step 3: Pick a Model
Start with one model only. Beginners often get better results by learning one model’s behavior first rather than jumping between all options immediately.
Step 4: Upload Reference Images if Needed
For image-to-image AI, use clear images with one strong focal point. Clean lighting, stable framing, and limited clutter usually help more than dramatic but messy references.
Step 5: Write a Clear Prompt
A useful prompt usually includes:
- subject
- setting
- pose or action
- style
- lighting
- restrictions
For example: “A stylish winter fashion portrait of a woman in a blue coat, standing in falling snow, cinematic lighting, realistic skin texture, clean background, editorial photography.”
Step 6: Generate a First Draft
Do not aim for perfection on the first try. The first generation should help you understand whether the model is interpreting the scene the way you expect.
Step 7: Review the Result Carefully
Look at:
- face or product consistency
- composition
- lighting
- prompt accuracy
- background quality
- whether the image feels clean enough for your use case
Step 8: Refine in Small Steps
Change one thing at a time. If the subject is right but the background is wrong, fix only the background. If the style is close but the framing is weak, focus only on framing.
Step 9: Save Your Best Direction
Once you get a result that works, use it as the base for variations. This is usually faster than restarting from scratch.
How to Use It for Text-to-Image AI
When you start with no reference image, HeyDream AI works as a flexible text-to-image AI tool for ideation. This is usually the better option for concept art, fantasy scenes, poster designs, product environments, and social media visuals.
A strong beginner prompt formula is:
subject + setting + style + lighting + important detail
Examples:
- “A luxury perfume bottle on black glass, soft studio lighting, cinematic reflections, premium commercial photography.”
- “A fantasy warrior standing in a foggy forest, dramatic moonlight, detailed armor, realistic concept art.”
- “A minimalist coffee poster, warm tones, clean typography space, modern lifestyle branding.”
The goal is clarity, not prompt length. Good AI text-to-image prompts feel visual and specific.
How to Use It for Image-to-Image AI
If you already have a strong image, image-to-image AI is often the smarter workflow. It is especially useful when you need to preserve identity, keep product proportions stable, or change only part of the scene.
Good use cases include:
- changing background or mood
- turning a photo into a stylized poster
- refining product presentation
- adjusting outfit, color palette, or atmosphere
- keeping a face consistent across versions
The best prompts for this workflow often use “change only” language, such as:
- “Keep the face and pose the same, change the background to a clean studio.”
- “Preserve product shape and label placement, improve lighting and reflections.”
- “Maintain the original composition, convert the scene into anime-inspired illustration.”
This helps the model understand what should stay fixed and what can change.
Why Nano Banana 2 Deserves Special Attention
Nano Banana 2 matters because it sits inside the generator while also having its own dedicated model page. In everyday use, it feels like a practical option for people who want fast image creation without making the workflow overly complicated.
It is especially useful for:
- fast concept drafts
- social content visuals
- product mockups
- early poster ideas
- quick character consistency testing
If you are unsure where to begin, Nano Banana 2 is a reasonable starting point because it fits both fast iteration and general-purpose creative work.
Model Comparison Charts
The best way to compare models is not by asking which one is “best” in the abstract. It is better to match each model to the kind of work you are doing.
Chart 1: HeyDream Models at a Glance
| Model | Best For | Speed Feel | Editing Strength | Main Tradeoff |
|---|---|---|---|---|
| Seedream 5.0 | polished commercial visuals | medium | strong | may be more than beginners need for rough drafts |
| Seedream 4.5 | balanced everyday creation | medium | solid | less premium than top-tier output |
| Seedream 4.0 | simple practical generation | medium-fast | decent | narrower final polish |
| Nano Banana Pro | cleaner premium-looking results | medium | strong | not the fastest for rough ideation |
| Nano Banana 2 | fast everyday workflows | fast | good | may need refinement for final showcase images |
| Nano Banana AI | lightweight creative testing | fast | moderate | less stable for demanding final use |
| HiDream I1 Fast | low-friction drafts | very fast | basic | lower refinement |
| HiDream I1 Dev | iterative experimentation | medium-fast | moderate | less rounded than premium models |
| HiDream I1 Full | detail-focused generation | medium | good | slower than speed-first options |
Chart 2: Best Model by Workflow
| Workflow | Best Starting Choice | Why It Fits | Tradeoff |
|---|---|---|---|
| Fast daily ideation | Nano Banana 2 | quick, flexible, practical | may need extra passes for final polish |
| Budget-friendly rough drafts | HiDream I1 Fast | speed-first workflow | less detail control |
| Balanced all-purpose use | Seedream 4.5 | good middle ground | not the strongest at either extreme |
| Product mockups | Nano Banana Pro | cleaner presentation | slower than the fastest options |
| Character concept testing | Nano Banana 2 | strong for repeat iteration | final rendering may still need upgrading |
| Polished campaign visuals | Seedream 5.0 | stronger finishing feel | best used after concept decisions |
| Experimental refinement | HiDream I1 Dev | useful for testing variations | less predictable than simpler workflows |
| Detailed final image pass | HiDream I1 Full | better for finish-focused work | not ideal for rapid bulk testing |
Chart 3: Text-to-Image vs Image-to-Image Fit
| Model | Text-to-Image AI | Image-to-Image AI | Best Use Case |
|---|---|---|---|
| Seedream 5.0 | excellent | strong | polished final scenes |
| Seedream 4.5 | strong | strong | balanced creation and edits |
| Seedream 4.0 | good | good | straightforward everyday generation |
| Nano Banana Pro | strong | strong | product and marketing visuals |
| Nano Banana 2 | strong | strong | fast general-purpose work |
| Nano Banana AI | good | moderate | lightweight prompt testing |
| HiDream I1 Fast | decent | moderate | speed-driven drafts |
| HiDream I1 Dev | good | good | experimentation and revision |
| HiDream I1 Full | strong | strong | more refined output stages |
Which Model Should Beginners Start With?
If you are completely new, start with one of these three paths:
- Nano Banana 2 for fast all-around use
- Seedream 4.5 for a balanced middle-ground workflow
- HiDream I1 Fast if your main goal is speed and volume
The important thing is not to compare every model on day one. Pick one, learn how it responds, and then branch out.
Best Prompting Practices
Whether you are using AI text-to-image or image-to-image AI, these habits help:
- keep prompts structured
- separate what must stay from what can change
- avoid conflicting style instructions
- use concrete lighting and framing language
- do not overload the prompt with unnecessary adjectives
- save successful prompt structures for reuse
A better prompt is usually a clearer prompt, not a longer one.
Common Mistakes to Avoid
Choosing the Wrong Workflow
Do not use pure text-to-image when identity preservation is the real goal. Use image-to-image AI instead.
Uploading Weak References
If the source image is blurry, crowded, or badly lit, editing becomes harder.
Comparing Models Unfairly
If you change the prompt every time, you are not really comparing models. Use the same base prompt first.
Over-Editing Good Results
Sometimes the best next step is not another dramatic change. A strong image often only needs one or two focused refinements.
Final Thoughts
HeyDream AI works best when you treat it as a flexible workspace rather than a single-model product. Use text-to-image AI when you are starting from zero. Use image-to-image AI when structure, identity, or product stability matters. Then match the model to the job instead of forcing one model to do everything.
For many users, the easiest path is simple: start with Nano Banana 2 or another balanced model, generate a clean first draft, refine only one issue at a time, and build variations from your strongest result. That approach makes AI image generation faster, more consistent, and much easier to control.
Related Articles
- Seedream 5.0 Image Generation Guide on HeyDream AI (Step-by-Step + Best Tools)
- Nano Banana 2 vs Qwen Image 2.0 vs Seedream 5.0: Which HeyDream Model Fits Your Workflow?
- Exploring HiDream I1 AI Image Generation: Models, Usage, and Recommended Use Cases
- Image to 3D on HeyDream AI: A Practical Tripo 3D Step-by-Step Guide
People Also Read
- What Is Nano Banana 2 and How Does It Work?
- Nano Banana Pro on DreamMachine AI: A Practical Way to Create Better AI Images
- Nano Banana 2 vs Nano Banana Pro: Which AI Image Model Should You Use?
- How to Convert Image to Video for Free with Imagetovideo AI
- How to Use Sea Imagine AI’s Image Generator: A Beginner-Friendly Tutorial