If you want to turn a written idea into a short video clip without bouncing between different tools, HeyDream AI’s text-to-video AI generator is built for exactly that. The interface keeps the workflow simple: pick a model, enter a prompt, optionally add a start frame or end frame, enhance the prompt, choose an aspect ratio, and generate.
What makes it more useful than a basic demo page is model variety. Instead of learning a separate workflow for every engine, you can test Veo, Kling, Seedance, Hailuo, Sora, and VIDU from one place. That makes HeyDream a practical starting point for anyone exploring text-to-AI video, whether you are making social clips, product ads, anime-style shots, or cinematic concept footage.
Why this tool is easy to start with
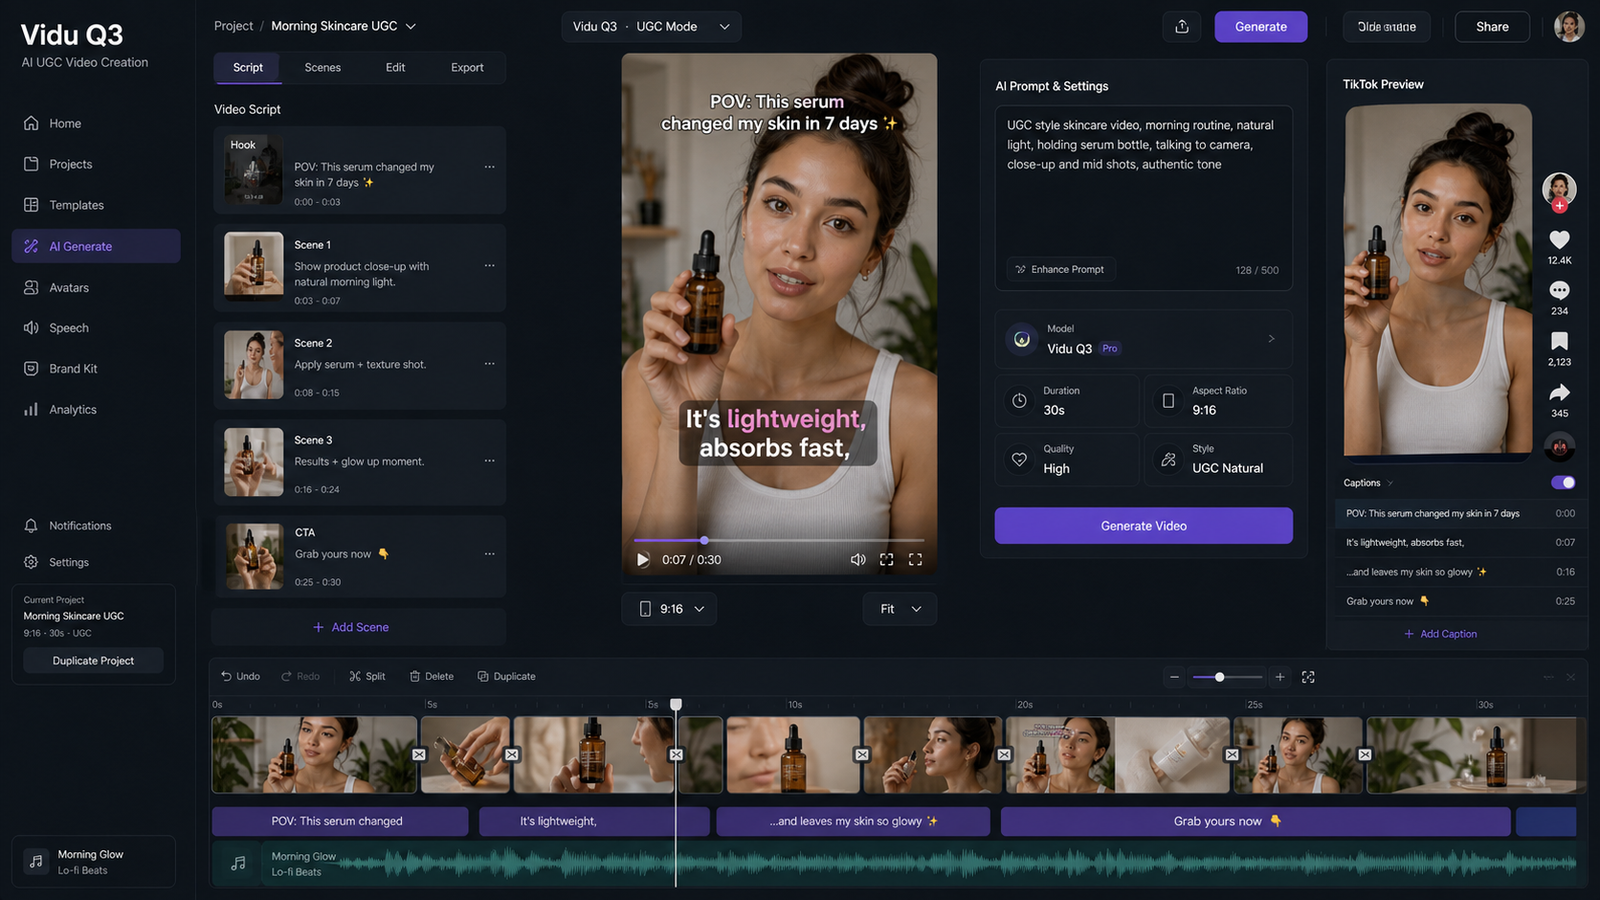
The current interface is laid out like a clean production panel. At the top, you choose a model version. Below that, the page shows whether the selected model includes audio, whether end-frame control is available, and where to upload a start frame if you want the shot to begin from a reference image. Then you move to the prompt box, use the built-in prompt enhancer if needed, set the aspect ratio, and generate.
That structure makes the AI video generator for text-to-video workflow easier to understand than many crowded AI dashboards. You do not need to guess where the core controls are, and you can compare models without rewriting your whole process from scratch.
How to create your first video
1. Pick the model based on your goal
Start by deciding what matters most: speed, quality, audio, resolution, shot length, or frame control. Fast models are good for testing ideas. Pro or quality-focused models are usually better for final outputs.
2. Write a prompt with clear visual direction
A strong prompt usually includes:
- subject
- action
- setting
- camera movement
- lighting
- style or mood
For example: “An astronaut walking through a neon-lit Tokyo alley at night, light rain, cinematic tracking shot, reflective puddles, realistic motion, dramatic blue and pink lighting.”
This gives your AI text-to-video request more structure than a short phrase like “astronaut in Tokyo.”
3. Add a start frame if you need more control
If you already have a reference image, upload it as the start frame. This is useful when you want the shot to begin with a particular character design, product composition, or art style.
4. Turn on end-frame guidance when supported
Some models support end-frame control. This is helpful when you want the clip to travel toward a defined final visual, such as a character turning to face the camera, a product landing in a hero shot, or a scene transitioning into a specific composition.
5. Use Enhance Prompt
The prompt enhancer can help expand your idea into more descriptive language. It is especially useful when you have the scene in mind but are not sure how to word it. A good workflow is to enhance the prompt once, then edit it manually so it stays focused.
6. Set aspect ratio and generate
Choose the aspect ratio based on where the clip will be used. A widescreen setting like 16:9 works well for YouTube, demos, and cinematic previews. Then review the output and rerun with more precise instructions if the motion, pacing, or composition is off.
Model comparison chart
Below is a practical comparison of the models visible in the current HeyDream interface.
| Model | Best For | Duration Shown | Resolution Shown | Audio | End Frame | Notes |
|---|---|---|---|---|---|---|
| Veo 3.1 Fast | Rapid ideation | Not shown | Not shown | Yes | Yes | Fast next-gen video |
| Veo 3.1 | Higher-quality generation | Not shown | Not shown | Yes | Yes | Quality-focused version |
| Seedance v1 Pro | Controlled advanced shots | 5–10s | 720–1080p | Not shown | Yes | Good for frame-guided workflows |
| Seedance 1.5 Pro | Balanced advanced generation | 5–12s | 480–720p | Yes | Not shown | Longer upper range than v1 Pro |
| Seedance 2.0 | Upcoming model | Not shown | Not shown | Not shown | Not shown | Coming soon |
| Kling v3.0 Standard | Modern general use | 5–10s | Not shown | Yes | Yes | Good all-round option |
| Kling v3.0 Pro | Higher-end Kling output | 5–10s | Not shown | Yes | Yes | Better pick for polished results |
| Kling v2.6 Pro | Reliable professional output | 5–10s | Not shown | Yes | Yes | Older but still strong |
| Hailuo 2.3 Fast | Quick testing | 6–10s | Not shown | Not shown | Not shown | Fast variant |
| Hailuo 2.3 Standard | General Hailuo generation | 6–10s | Not shown | Not shown | Not shown | Middle option |
| Hailuo 2.3 Pro | Short premium output | 6s | Not shown | Not shown | Not shown | Short fixed clip length shown |
| Sora 2 | Efficient generation | 10s | Not shown | Not shown | Not shown | Listed as Sora 2 Small |
| VIDU Q3 | Audio-enabled flexible clips | 5–15s | 540–1080p | Yes | Not shown | One of the longest visible ranges |
Quick takeaway
Not every model gives you the same control set. Some are better for built-in audio. Some are better for end-frame guidance. Some show higher output resolution or longer clip duration. That is why HeyDream works well as a text-to-video AI hub: you can compare real trade-offs from one interface instead of guessing from marketing copy alone.
Which model should you choose?
Choose Veo 3.1 Fast for quick drafts
If you want to test multiple concepts quickly, Veo 3.1 Fast is a strong first stop. It supports audio and end-frame control, so it is not just a stripped-down preview tool.
Choose Veo 3.1 for better-looking final shots
If your concept already works and you want to push toward a cleaner, more refined result, Veo 3.1 is the better choice.
Choose Kling v3.0 Pro for polished cinematic clips
Kling v3.0 Pro looks like one of the best options for creators who want a premium-feeling model with audio and end-frame support.
Choose Seedance when frame control matters
Seedance v1 Pro stands out because the visible feature tags emphasize resolution and end-frame support. That makes it attractive for structured scene transitions and guided motion.
Choose VIDU Q3 when you want longer output
VIDU Q3 shows a 5–15 second range plus audio and up to 1080p. That makes it appealing for users who need longer clips from a text-to-video AI generator, especially for ads, intros, or storytelling snippets.
Watch Seedance 2.0
Even though it is marked “Coming Soon,” it is worth tracking because it is positioned as a cinematic-quality video model.
Prompting tips that improve results
A lot of weak outputs come from weak prompts, not weak models. To get better results from text-to-AI video, try this formula:
Subject + Action + Environment + Camera + Lighting + Style
Here are a few examples:
Cinematic realism “A lone warrior crossing a snowy mountain pass, slow forward dolly shot, wind-blown cloak, golden sunset, realistic cinematic detail.”
Anime style “A magical girl leaping across rooftops at dusk, dynamic camera pan, glowing city lights, expressive anime shading, energetic motion.”
Product ad “A luxury perfume bottle rotating on a black reflective surface, macro camera movement, soft spotlight, elegant commercial style.”
Start-to-end transition “A young traveler begins in a foggy forest and ends on a cliff overlooking a bright sunrise, smooth cinematic transition, hopeful mood.”
Keep one shot focused. If you ask for five actions, three camera moves, two styles, and a complicated scene change in a few seconds, the result often becomes messy.
Common mistakes and a smarter workflow
The most common mistake is being too vague. “Make a cool video” gives the model very little to work with. Another mistake is overstuffing the prompt. More detail helps only when the details point in the same direction.
A practical workflow looks like this:
- Start with a fast model to test the concept.
- Simplify the prompt until the motion reads clearly.
- Add a start frame if character or product consistency matters.
- Add an end frame when you want a deliberate visual destination.
- Move to a higher-quality model for the final pass.
- Regenerate with small changes instead of rewriting the whole scene every time.
That is the real advantage of HeyDream’s AI video generator for text-to-video: it makes model testing feel like part of one workflow, not a completely different task every time you switch engines.
Final thoughts
HeyDream AI is a useful platform for anyone who wants to explore AI video creation without getting locked into one model too early. The interface is simple enough for beginners, but the model selection is broad enough for serious comparison. If your goal is to learn what different engines actually do well, this AI text-to-video tool gives you a clean place to start.
Other Tools and Models to Recommend
- Image to Video AI for creators who want to begin with a still image and animate it into a short clip.
- Photo to Anime Generator for building stylized character references before moving into video creation.
- Veo 3.1 AI if you want a more premium cinematic model for realistic motion and polished results.
- Sora 2 AI if you want to explore high-end text-to-video and image-to-video generation with a different model style.
- Seedance 2.0 AI if you want to keep an eye on an upcoming cinematic model with audio-first potential.
Related Articles
- Text to Video AI Generator with Audio
- How to Create High-Quality AI Videos with Veo 3.1 on HeyDream AI
- Veo 3.1 Guide on HeyDream: Better Prompts, Settings, Fixes
- Seedance 2.0 vs 1.0: What’s Better for AI Video
- Image to Video AI: Create Videos from Images
- OpenAI Sora 2 AI Video Generator
People Also Read
- Try Veo 3.1 in Dream Machine AI: A Practical Guide to Text-to-Video and Image-to-Video Creation
- Sora vs Kling AI: Revolutionizing Video Generation with AI
- Kling 3.0: Latest Updates + How to Use It on VideoWeb AI
- Vidu Q3 AI vs Kling 3.0: Which AI Video Model Should You Use on VideoWeb AI?
- SeaImagine AI Text-to-Video Guide: How to Choose Models and Create Better Clips
- The 2026 Image-to-Video Guide for Sea Imagine AI: Best Models & Prompts