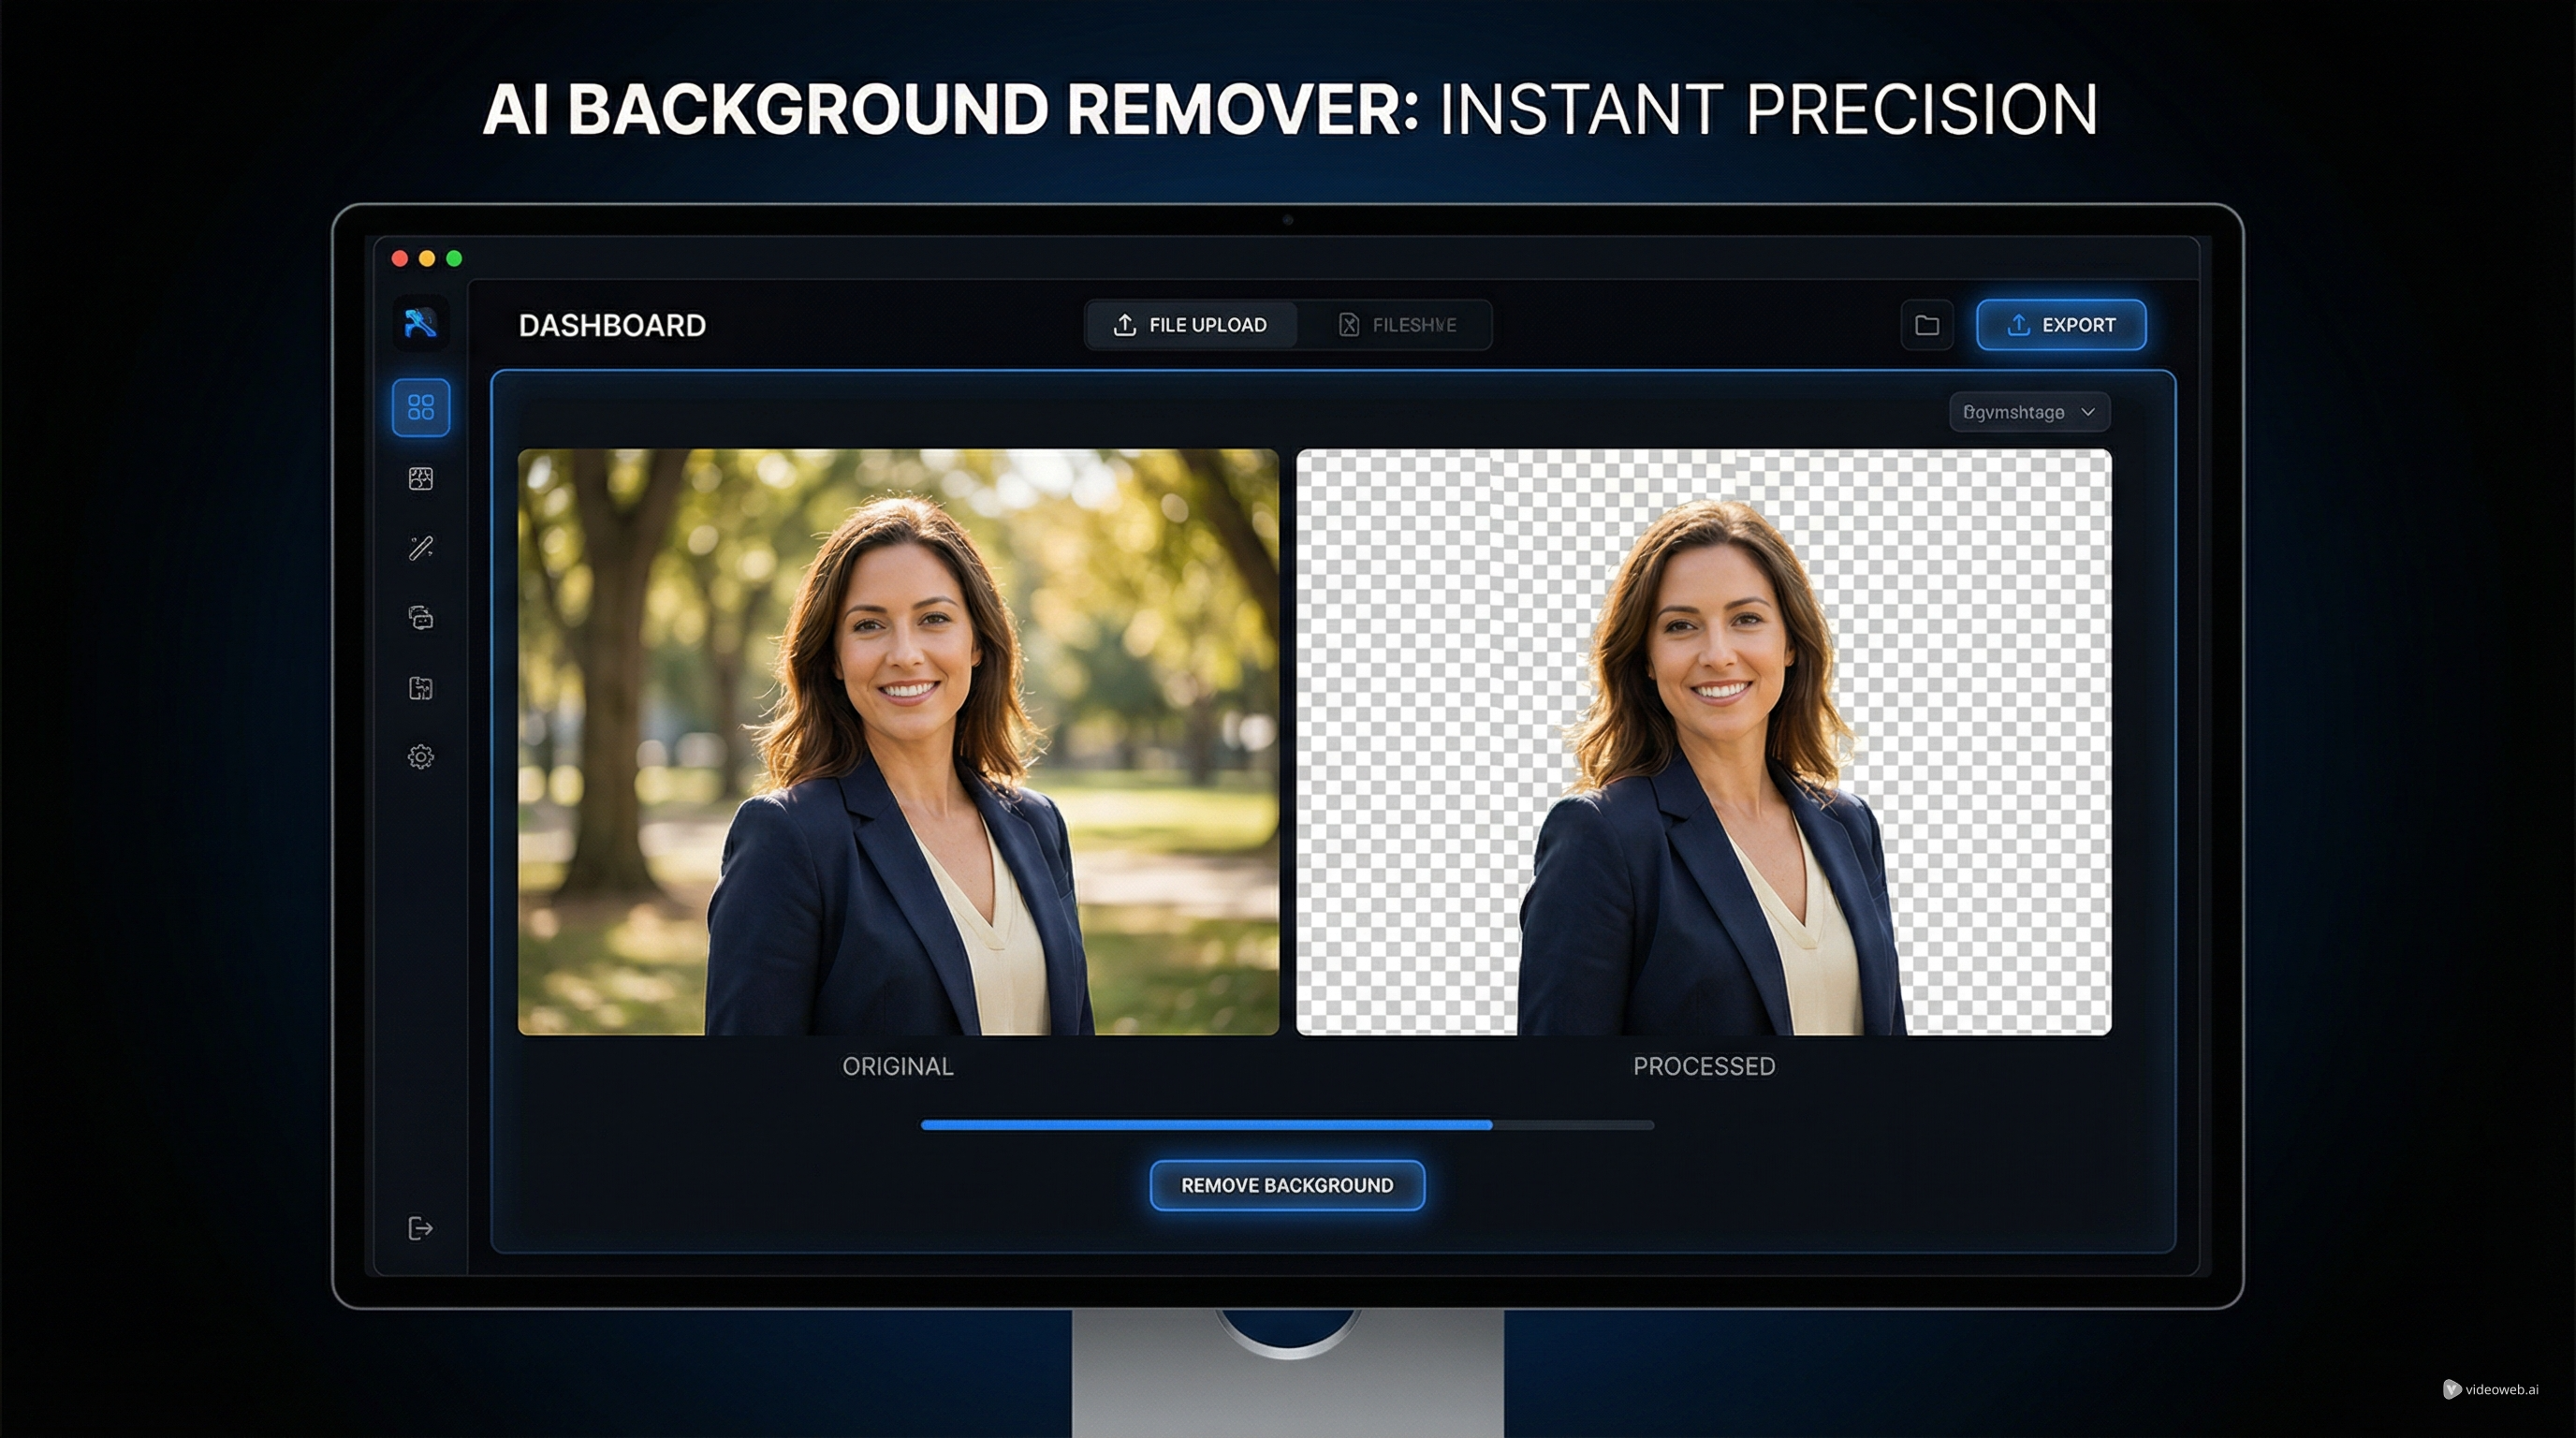
How to Use HeyDream AI’s Free Background Remover for Cleaner Images and Faster Creative Workflows
A clean cutout can change what an image is useful for. A product photo becomes easier to place on a marketplace listing. A portrait becomes simpler to turn into a thumbnail, banner, or profile asset. A fashion image becomes easier to move into a new background, prompt-based edit, or animation workflow. If you want to do that quickly without opening heavy editing software, HeyDream AI’s free background remover AI tool is an easy place to start.
Instead of tracing edges by hand, you upload an image, let the tool isolate the subject, and download a cleaned version in a browser. That makes it practical for creators, marketers, online sellers, and anyone who needs a fast visual cleanup step before doing something more advanced.
Why use a browser-based background remover?
Not every project needs detailed manual masking. In many real workflows, speed matters more than perfection. A good background remover online free tool helps you get a usable result fast so you can move on to the next creative step.
This is especially useful for e-commerce photos, social graphics, creator branding, mockups, presentation slides, and quick ad concepts. A strong AI background remover free workflow is not only about deleting the background. It is about preparing the image for design, generation, editing, or motion.
Because the tool runs in the browser, it also reduces friction. You do not need special desktop software, advanced editing experience, or a long setup process. That is a big advantage when you are working quickly or processing multiple images.
Step 1: Upload a clear source image
The easiest way to get a strong result is to start with a strong source image. Photos with a clear main subject, readable lighting, and visible contrast between the subject and background usually work best.
Portraits, product shots, beauty images, and fashion photos are often ideal for an image background remover free workflow. If the background is extremely busy, the subject is blurry, or the edges blend heavily into the environment, the first-pass cutout may still work, but you may notice softer outlines or missed details.
Hair, transparent materials, reflective surfaces, and thin accessories are common challenge areas for any automated remover. Even so, a clean original image gives you a much better chance of getting a polished result immediately.
Step 2: Let the tool remove the background
Once you upload the image, the tool processes the file and generates a cutout automatically. This is where a free image background remover becomes genuinely useful. Instead of spending time on manual selection, you get a first result almost immediately.
For many everyday uses, that automatic result is already good enough. If you need a transparent cutout for a product listing, a deck, a social post, or a concept layout, you may be able to download it right away and keep moving.
That speed is the real strength of a background remover free online tool. It shortens the gap between raw image and reusable asset.
Step 3: Check the edges before you export
Fast does not mean careless. Before downloading, look closely at the edges of the subject. Areas like hair, shoulders, fingers, flower petals, soft shadows, and object bases deserve extra attention.
When using a free online background remover, the smartest question is not whether the image is technically perfect. It is whether it is clean enough for the size and context where it will actually be used.
A small edge issue may not matter at all in a thumbnail or concept mockup. But if the image is going into a premium ad, beauty visual, or large-format product page, a more careful review matters. This is why practical judgment is part of the workflow. Use speed when speed is enough. Save detailed cleanup for the visuals that really need it.
Step 4: Use the cutout in real workflows
Once the background is gone, the image becomes much more flexible. You can place the subject on a white backdrop, a transparent canvas, a branded graphic, or a completely new environment.
That makes a background remover AI workflow useful across several common use cases. For e-commerce, it helps create cleaner product photos. For personal branding, it helps isolate portraits for banners, profile pictures, and thumbnails. For fashion or beauty content, it makes it easier to separate the subject from the original environment before moving into a new concept.
It is also useful as a preparation step before other AI tools. After removing the background, you can feed the cleaned image into other creative workflows, including prompt generation, image editing, and animation. A cleaner subject often produces a cleaner downstream result.
Step 5: Pair the cutout with the right next tool
Background removal is usually not the final destination. It is the setup step. What comes next depends on your goal.
If you want to turn the cleaned visual into reusable text, an image-to-prompt tool is a natural next move. If you want to generate a new version of the image, an image generator makes more sense. If you want motion, a video or image-to-video workflow is the logical follow-up.
This is where a background remover online free workflow becomes more valuable than it first appears. It helps you create cleaner input material for the rest of your pipeline.
For example, a cutout portrait can become a better subject for prompt-based restyling. A product cutout can be dropped into a new branded background. A fashion subject can be isolated before being used in a stylized generation or motion concept.
Step 6: Choose the right model after cleanup
Model choice matters once your image is ready for the next stage. If you want quick generation and flexible everyday creation, Nano Banana 2 is a strong option. If you want more controlled or edit-oriented work, Qwen Image 2.0 is worth considering. If your goal is a more polished, refined output with broader visual flexibility, Seedream 5.0 is a strong candidate.
The right choice depends on what you want after background removal. If the cleaned asset is mainly a reference for new generations, you may prioritize prompt responsiveness. If it is a base for controlled editing, you may care more about edit quality. If it is part of a premium creative workflow, visual polish may matter most.
The useful pattern is simple: remove the background first, decide whether you need prompt extraction, still-image generation, editing, or motion, and then choose the tool or model that best supports that goal.
Final thoughts
HeyDream AI’s free background remover is most useful when you want a quick browser-based way to isolate a subject and move on. It reduces editing friction, handles many everyday use cases well, and fits naturally into larger creative workflows.
Use it when you need faster cutouts, cleaner assets, and better preparation for whatever comes next. A cleaned image is easier to design with, easier to describe, and easier to transform. That is what makes background removal more than a small utility step. Done well, it becomes the foundation for better creative work.
Recommended Tools
- HeyDream AI Background Remover
- HeyDream AI Image to Prompt
- HeyDream AI Image Generator
- HeyDream AI Image to Image Generator
- HeyDream AI Image to Video
Recommended Models
- Nano Banana 2
- Qwen Image 2.0
- Seedream 5.0
Related Article
- HeyDream AI Image Generator Guide: Best Models for Text-to-Image and Image-to-Image
- Nano Banana 2 vs Qwen Image 2.0 vs Seedream 5.0: Which HeyDream Model Fits Your Workflow?
- Seedream 5.0 Image Generation Guide on HeyDream AI (Step-by-Step + Best Tools)
- Image to 3D on HeyDream AI: A Practical Tripo 3D Step-by-Step Guide